Order Workflow
An Order is a collection of one or more ProductVariants which can be purchased by a Customer. Orders are represented internally by the Order entity and in the GraphQL API by the Order type.
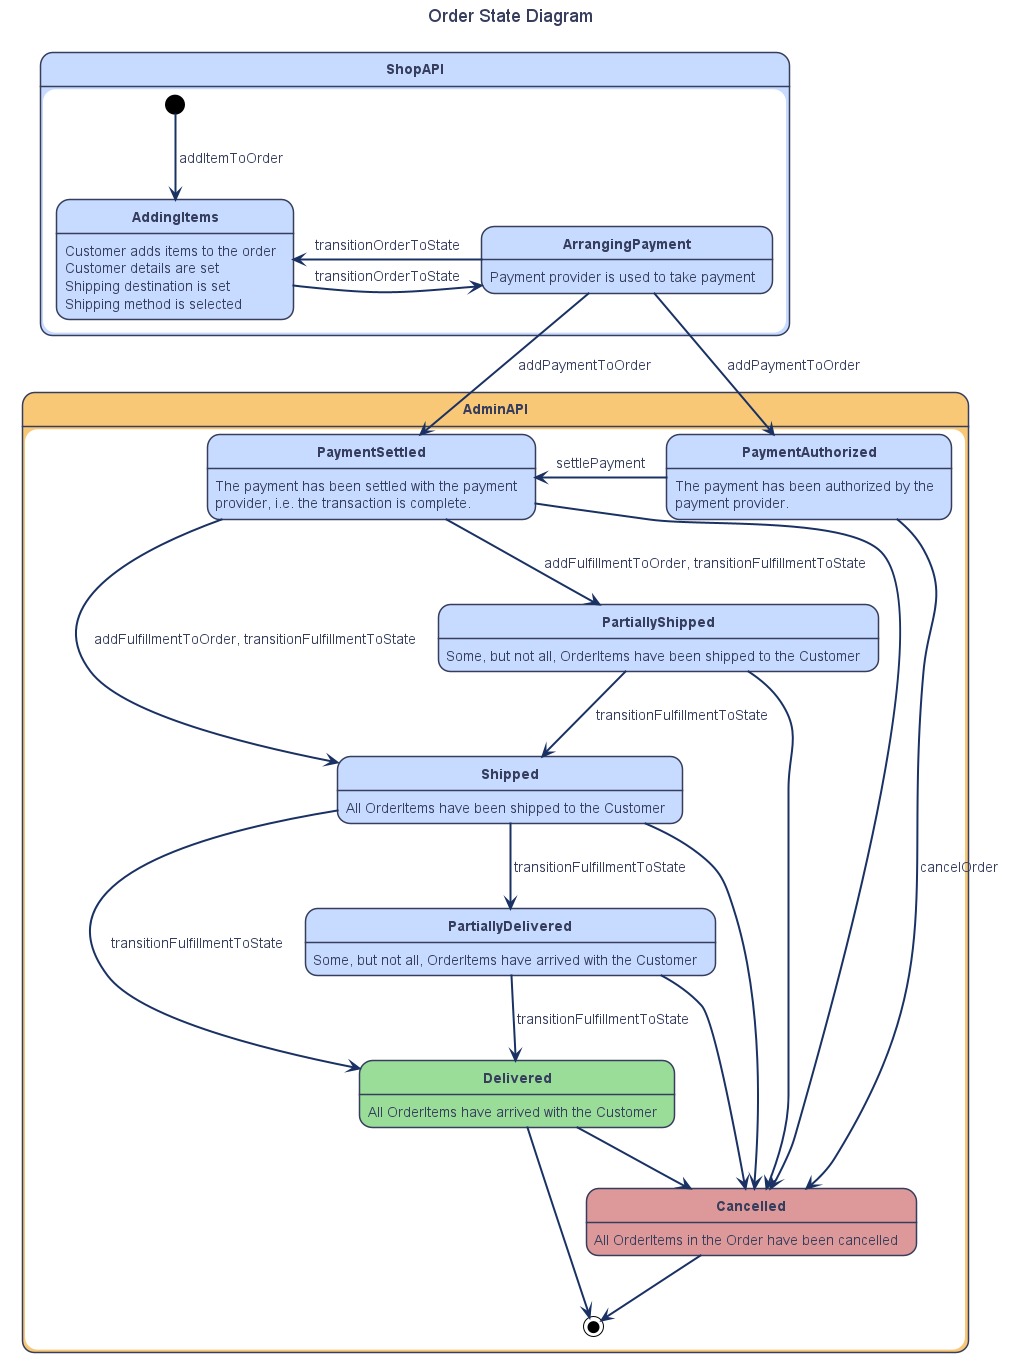
Order State
Every Order has a state property of type OrderState. The following diagram shows the default states and how an Order transitions from one to the next.
Note that this default workflow can be modified to better fit your business processes. See the Customizing the Order Process guide.
Structure of an Order
In Vendure an Order consists of one or more OrderLines (representing a given quantity of a particular SKU), which in turn contain one or more OrderItems (which represent the individual physical units).
Here is a simplified diagram illustrating this relationship:

So if the customer adds 2 Widgets to the Order, there will be one OrderLine containing two OrderItems, one for each of the added Widgets.
Shop client order workflow
The GraphQL Shop API Guide lists the GraphQL operations you will need to implement this workflow in your storefront client application.
In this section, we’ll cover some examples of how these operations would look in your storefront.
Manipulating the Order
First, let’s define a fragment for our Order that we can re-use in subsequent operations:
fragment ActiveOrder on Order {
  id
  code
  state
  couponCodes
  subTotalWithTax
  shippingWithTax
  totalWithTax
  totalQuantity
  lines {
    id
    productVariant {
      id
      name
    }
    featuredAsset {
      id
      preview
    }
    quantity
    linePriceWithTax
  }
}
Then we can add an item to the Order:
mutation AddItemToOrder($productVariantId: ID! $quantity: Int!){
  addItemToOrder(productVariantId: $productVariantId, quantity: $quantity) {
    ... ActiveOrder
    ... on ErrorResult {
      errorCode
      message
    }
  }
}
To remove an item from the order
mutation RemoveItemFromOrder($orderLineId: ID!){
  removeOrderLine(orderLineId: $orderLineId) {
    ... ActiveOrder
    ... on ErrorResult {
      errorCode
      message
    }
  }
}
To alter the quantity of an existing OrderLine
mutation AdjustOrderLine($orderLineId: ID! $quantity: Int!){
  adjustOrderLine(orderLineId: $orderLineId, quantity: $quantity) {
    ... ActiveOrder
    ... on ErrorResult {
      errorCode
      message
    }
  }
}
At any time we can query the contents of the active Order:
query ActiveOrder {
  activeOrder {
    ... ActiveOrder
  }
}
Checking out
During the checkout process, we’ll need to make sure a Customer is assigned to the Order. If the Customer is already signed in, then this can be skipped since Vendure will have already assigned them. If not, then you’d execute:
mutation SetCustomerForOrder($input: CreateCustomerInput!){
  setCustomerForOrder(input: $input) {
    ... ActiveOrder
    ... on ErrorResult {
      errorCode
      message
    }
  }
}
Then we need to set the shipping address:
mutation SetShippingAddress($input: CreateAddressInput!){
  setOrderShippingAddress(input: $input) {
    ... ActiveOrder
    ... on ErrorResult {
      errorCode
      message
    }
  }
}
Once the shipping address is set, we can find out which ShippingMethods can be used on this Order:
query GetShippingMethods{
  eligibleShippingMethods {
    id
    name
    code
    description
    priceWithTax
  }
}
The Customer can then choose one of the available ShippingMethods, and we then set it on the Order:
mutation SetShippingMethod($shippingMethodId: ID!){
  setOrderShippingMethod(shippingMethodId: $shippingMethodId) {
    ... ActiveOrder
    ... on ErrorResult {
      errorCode
      message
    }
  }
}
We can now do the same for PaymentMethods:
query GetPaymentMethods{
  eligiblePaymentMethods {
    id
    name
    code
    description
    isEligible
    eligibilityMessage
  }
}
Once the customer is ready to pay, we need to transition the Order to the ArrangingPayment state. In this state, no further modifications are permitted. If you do need to modify the Order contents, you can always transition back to the AddingItems state:
mutation TransitionOrder($state: String!){
  transitionOrderToState(state: $state) {
    ... ActiveOrder
    ... on ErrorResult {
      errorCode
      message
    }
  }
}
Finally, add a Payment to the Order:
mutation AddPayment($input: PaymentInput!){
  addPaymentToOrder(input: $input) {
    ... ActiveOrder
    ... on ErrorResult {
      errorCode
      message
    }
  }
}
If the Payment is successful, the Order will now be complete. You can forward the Customer to a confirmation page using the Order’s code:
query OrderByCode($code: String!) {
  orderByCode(code: $code) {
    ...ActiveOrder
  }
}
ActiveOrderStrategy
In the above examples, the active Order is always associated with the current session and is therefore implicit - which is why there is no need to pass an ID to each of the above operations.
Sometimes you do want to be able to explicitly specify the Order you wish to operate on. In this case, you need to define a custom ActiveOrderStrategy.